








Task Scheduler is one of the most powerful yet underused tools built into Windows 11. Whether you want to automatically run a backup script every night, launch an app when you log in, restart your PC on a set schedule, or clean up temporary files without lifting a finger, Task Scheduler in Windows 11 can handle it all — completely free, with no third-party software required.
In this guide, you’ll learn exactly how to use Task Scheduler in Windows 11, including four different methods to open it, a full walkthrough of creating your first automated task, and answers to the most common questions users have about this feature. By the end, you’ll be able to automate almost any repetitive task on your PC in just a few clicks.
Let’s get started.
What Is Task Scheduler in Windows 11?
Task Scheduler is a built-in Windows utility that lets you automate the execution of programs, scripts, and commands based on specific triggers — such as a time of day, system startup, user login, or even a particular system event. It has existed in Windows for decades, but Windows 11 refines it with a cleaner interface while keeping the same reliable engine underneath.
Common use cases include:
- Running antivirus scans on a schedule
- Launching backup software every night
- Opening specific apps automatically at startup
- Clearing temporary files or cache folders weekly
- Sending automated reminders or notifications
- Running PowerShell or batch scripts unattended
Now let’s look at the different ways to access this tool.
4 Methods to Open and Use Task Scheduler in Windows 11
There isn’t just one way to launch Task Scheduler. Depending on your workflow, one of these four methods will likely be the fastest for you.
Method 1: Open Task Scheduler Using Windows Search
The simplest and most beginner-friendly method.
Click the Start button or press the Windows key.
Type Task Scheduler in the search bar.
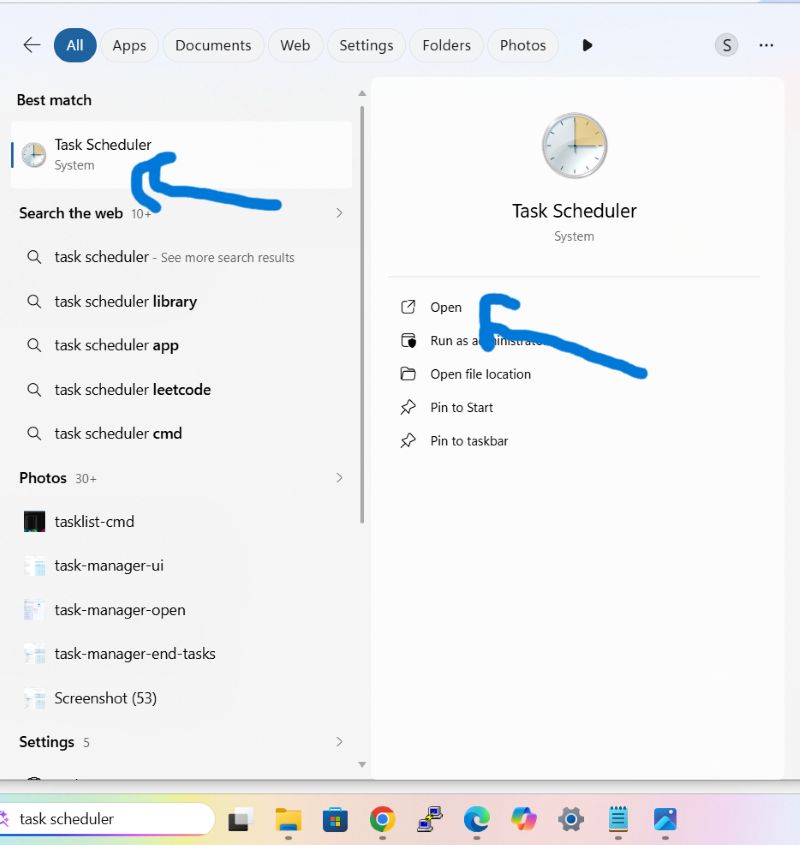
Click on Task Scheduler from the search results (it appears under “Best match”).
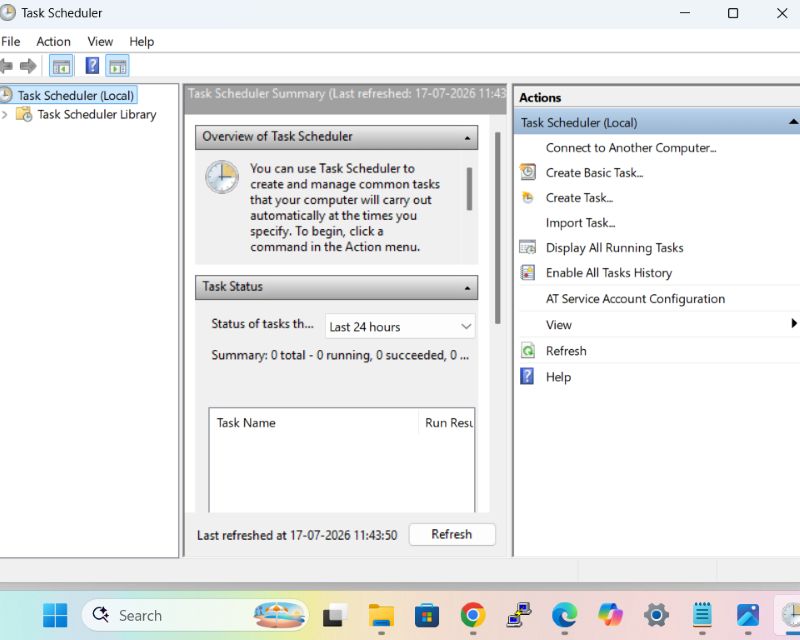
This opens the Task Scheduler app directly, ready for you to browse or create tasks.
Method 2: Open Task Scheduler Using the Run Command
Ideal for power users who prefer keyboard shortcuts over clicking through menus.
- Press Windows key + R to open the Run dialog box.
- Type
taskschd.mscand press Enter. - Task Scheduler will launch immediately.
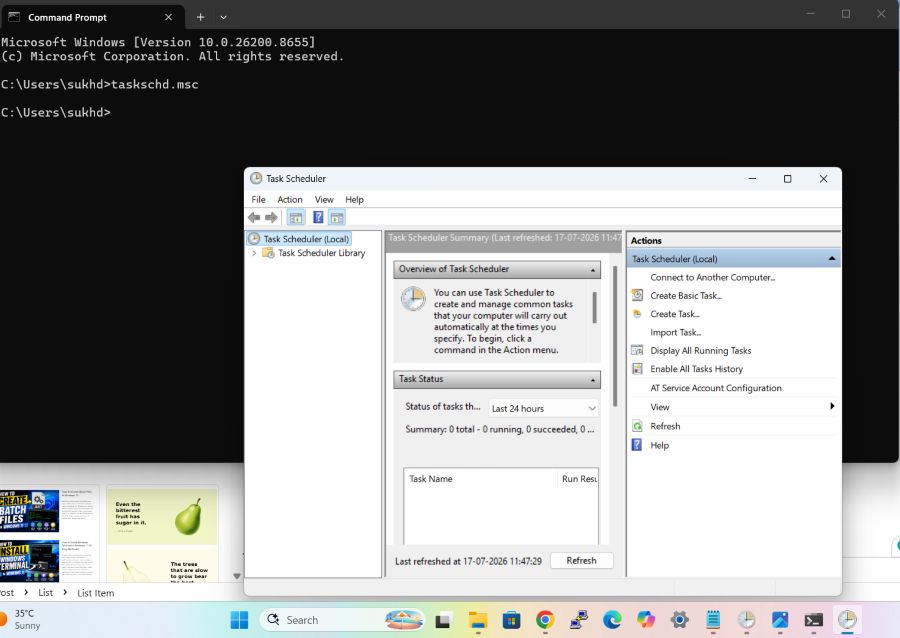
This is one of the fastest methods because it skips the Start Menu entirely and works even if File Explorer or the Start Menu is temporarily unresponsive.
Method 3: Open Task Scheduler via Control Panel
This method is useful if you’re already navigating through Control Panel for other administrative tasks.
- Open Control Panel (search for it via Start Menu if needed).
- Set View by to Large icons or Small icons.
- Click on Administrative Tools.
- Double-click Task Scheduler from the list.
Control Panel groups Task Scheduler alongside other system utilities like Disk Cleanup and Event Viewer, which makes this route convenient for IT admins and troubleshooters.
Method 4: Open Task Scheduler Using Command Prompt or PowerShell
This method is best for advanced users, scripters, and anyone automating tasks through the command line.
- Open Command Prompt or PowerShell (search for either in the Start Menu, or right-click the Start button and select Terminal).
- Type the following command and press Enter:
taskschd.mscAlternatively, in PowerShell you can also manage tasks directly without opening the GUI at all, using cmdlets like:
powershell
Get-ScheduledTaskThis lists all currently scheduled tasks on your system, which is especially useful for auditing or scripting bulk changes.
How to Create a Scheduled Task in Windows 11 (Step-by-Step)
Once Task Scheduler is open using any of the methods above, follow these steps to create your first automated task.
Step 1: Open the Create Task Wizard
In the right-hand Actions panel of Task Scheduler, click Create Basic Task. For more advanced options (like multiple triggers or conditions), click Create Task instead.
Step 2: Name and Describe Your Task
Enter a clear, descriptive name — for example, “Nightly Backup” or “Weekly Disk Cleanup” — along with an optional description. This helps you identify the task later, especially if you end up creating several over time.
Step 3: Choose a Trigger
The trigger determines when your task runs. Windows 11 lets you choose from options including:
- Daily – runs at a specific time every day
- Weekly – runs on chosen days of the week
- Monthly – runs on a specific date each month
- One time – runs once at a scheduled date and time
- When the computer starts
- When I log on
- When a specific event is logged
Select the trigger that fits your automation goal and click Next.
Step 4: Set the Time and Recurrence
If you selected a time-based trigger, specify the exact start time and recurrence pattern (e.g., every day, every 3 days, or every Monday and Friday).
Step 5: Choose an Action
This is what the task will actually do. The most common option is Start a Program, which lets you:
- Click Browse and select the executable file (.exe), script (.bat, .ps1), or shortcut you want to run.
- Optionally add arguments if the program requires specific parameters.
- Optionally set a start-in directory if the program needs a specific working folder.
Step 6: Review and Finish
Task Scheduler shows a summary of everything you’ve configured — trigger, action, and any conditions. Review it carefully, then click Finish.
Your task now appears in the Task Scheduler Library, where you can right-click it anytime to Run, Disable, Delete, or Edit Properties.
Step 7 (Optional): Fine-Tune Advanced Settings
Right-click your new task and select Properties to access additional controls:
- Conditions tab – run only if the computer is idle, on AC power, or has a network connection
- Settings tab – allow the task to run on demand, restart if it fails, or stop if it runs too long
- Security options – run the task with highest privileges or under a different user account
These settings are particularly useful for tasks that need to run reliably even when you’re not actively using the PC.
Tips for Managing Tasks Effectively
- Use Task History (View menu → Enable All Tasks History) to troubleshoot why a task didn’t run as expected.
- Group related tasks into custom folders inside the Task Scheduler Library for easier organization.
- Test manually first by right-clicking a new task and selecting Run, so you can confirm it behaves correctly before relying on the scheduled trigger.
- Avoid overlapping heavy tasks (like backups and scans) at the same time to prevent performance slowdowns.
Frequently Asked Questions (FAQ)
1. Is Task Scheduler free to use in Windows 11? Yes. Task Scheduler is a built-in Windows feature and requires no additional purchase, subscription, or third-party download.
2. Can I run Task Scheduler tasks without logging in? Yes, if you configure the task to “Run whether user is logged on or not” under the General tab in task properties. You’ll need to enter your account password to enable this option.
3. Why isn’t my scheduled task running? Common causes include incorrect trigger conditions (e.g., “only run on AC power” while on battery), the task being disabled, an expired trigger, or insufficient permissions. Check the History tab of the task for detailed error codes.
4. Can I schedule a task to run a script instead of a program? Yes. In the Action step, you can point Task Scheduler to a batch file (.bat), PowerShell script (.ps1), or any executable, and even pass command-line arguments to it.
5. How do I delete or disable a scheduled task? Open Task Scheduler, find the task in the Task Scheduler Library, right-click it, and choose Disable to pause it or Delete to remove it permanently.
6. Can I export and import scheduled tasks to another PC? Yes. Right-click any task and select Export to save it as an XML file. On another PC, open Task Scheduler, click Import Task in the Actions panel, and select that XML file.
Conclusion
Task Scheduler in Windows 11 is a genuinely powerful automation tool hiding in plain sight. Whether you prefer opening it through Windows Search, the Run command, Control Panel, or the Command Prompt, getting started takes only a few seconds. From there, creating a scheduled task is a straightforward, wizard-guided process that lets you automate backups, script execution, app launches, and system maintenance without any manual effort.
Once you’re comfortable with the basics covered in this tutorial, explore the advanced Conditions and Settings tabs to build more resilient, production-ready automations. With a little setup, Task Scheduler can save you hours of repetitive manual work every month — making it one of the most valuable free tools already sitting on your Windows 11 PC.