








BitLocker is one of the most valuable security tools built into Windows 11. It encrypts your entire drive, scrambling your data so that anyone who doesn’t have the correct password or recovery key can’t access your files — even if they physically remove the drive and plug it into another computer. For most people, this kind of protection is a genuine benefit, especially on laptops that could be lost or stolen.
That said, BitLocker isn’t something every user wants running at all times. There are plenty of legitimate reasons to turn it off. Maybe you’re troubleshooting a stubborn boot issue and need to rule out encryption as the culprit. Maybe you’re about to swap out your motherboard or upgrade other hardware, and you don’t want BitLocker locking you out because it detected a “new” device. Maybe you’re setting up a dual-boot system with Linux and need an unencrypted partition. Or maybe you simply decided the performance trade-off and recovery-key hassle isn’t worth it for your particular device and threat model.
Whatever your reason, disabling BitLocker in Windows 11 is a well-supported, reversible process. In this guide, we’ll walk through exactly what BitLocker does, several different ways to turn it off, what to expect during the decryption process, and answers to the most common questions people have about disabling it. By the end, you’ll have everything you need to make an informed decision and carry it out safely.
What Is BitLocker, and What Does Disabling It Actually Do?
Before diving into the how-to, it’s worth understanding what’s happening under the hood. BitLocker is a full-disk encryption feature that Microsoft first introduced with Windows Vista and has refined in every version since, including Windows 11. When enabled, it encrypts the entire volume — not just select files — using the AES encryption algorithm. On modern PCs, encryption keys are typically tied to a Trusted Platform Module (TPM) chip, which stores cryptographic keys securely and checks the integrity of the boot process every time you start your computer.
When you “disable” or “turn off” BitLocker, Windows doesn’t just stop enforcing the lock — it fully decrypts the drive, converting all your data back into its normal, unencrypted state. This is different from “suspending” BitLocker, which is a related but distinct feature that temporarily pauses protection (often used automatically during firmware or driver updates) without decrypting the whole drive. Full decryption takes longer than a suspension because Windows has to process every sector of the disk, but the end result is a drive with no encryption at all, which is what most people mean when they say they want to “disable BitLocker.”
It’s also worth noting that BitLocker’s availability differs across Windows 11 editions. Windows 11 Home includes a simplified version called “Device Encryption,” which behaves similarly but has fewer configuration options. Windows 11 Pro, Enterprise, and Education include the full BitLocker suite, with more granular control through the Control Panel and Group Policy. The instructions below will work for either edition, though menu names may vary slightly.
Things to Consider Before You Disable BitLocker
Turning off encryption is a meaningful decision, so it’s worth pausing for a moment before you proceed.
First, consider your physical security situation. If your device could be lost, stolen, or accessed by people you don’t fully trust — for instance, a laptop you carry to public spaces, or a shared family computer — BitLocker provides a real layer of protection against someone extracting your files by physically removing the drive. Disabling it means anyone with physical access and basic technical know-how could potentially read your data.
Second, think about why you’re disabling it in the first place. If it’s for a temporary task, like a firmware update or hardware swap, you might actually be better served by suspending BitLocker rather than fully turning it off. Suspension keeps your data encrypted at rest but tells Windows not to enforce the usual integrity checks during the next boot, which avoids accidentally triggering recovery-key prompts. Full decryption is more appropriate when you don’t intend to re-enable protection anytime soon, or when you’re troubleshooting an issue that might specifically be related to encryption itself.
Third, remember that decryption is not instantaneous. Depending on the size of your drive and how much data is stored on it, this process can take anywhere from a few minutes to several hours. Your computer remains usable during this time, but you shouldn’t interrupt the process by shutting down abruptly, removing power, or letting your battery die mid-decryption, as this could lead to data corruption in rare cases.
With those considerations in mind, let’s get into the actual methods.
Method 1: Disabling BitLocker via Settings
This is the most straightforward approach for most users, particularly on Windows 11 Home, where the feature appears as “Device Encryption.”
Open the Settings app. You can do this quickly with the keyboard shortcut Win + I, or by clicking the Start menu and selecting the gear icon.
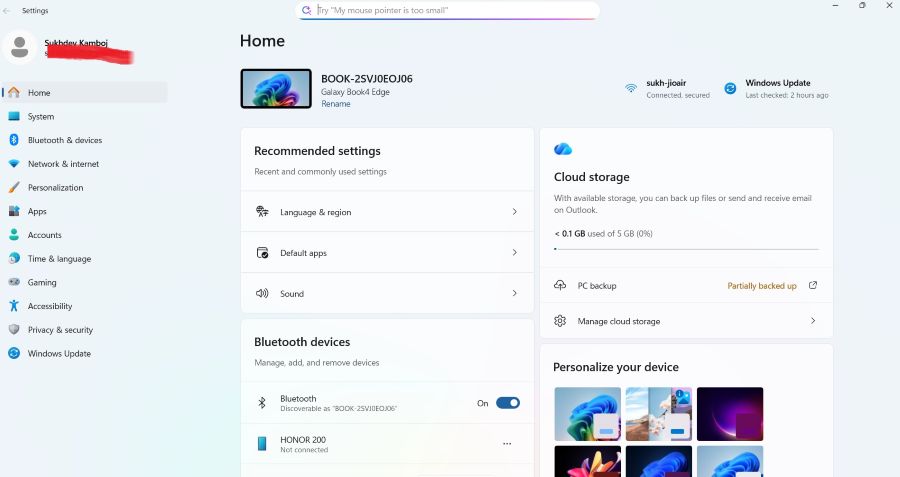
Navigate to Privacy & security in the left-hand sidebar.
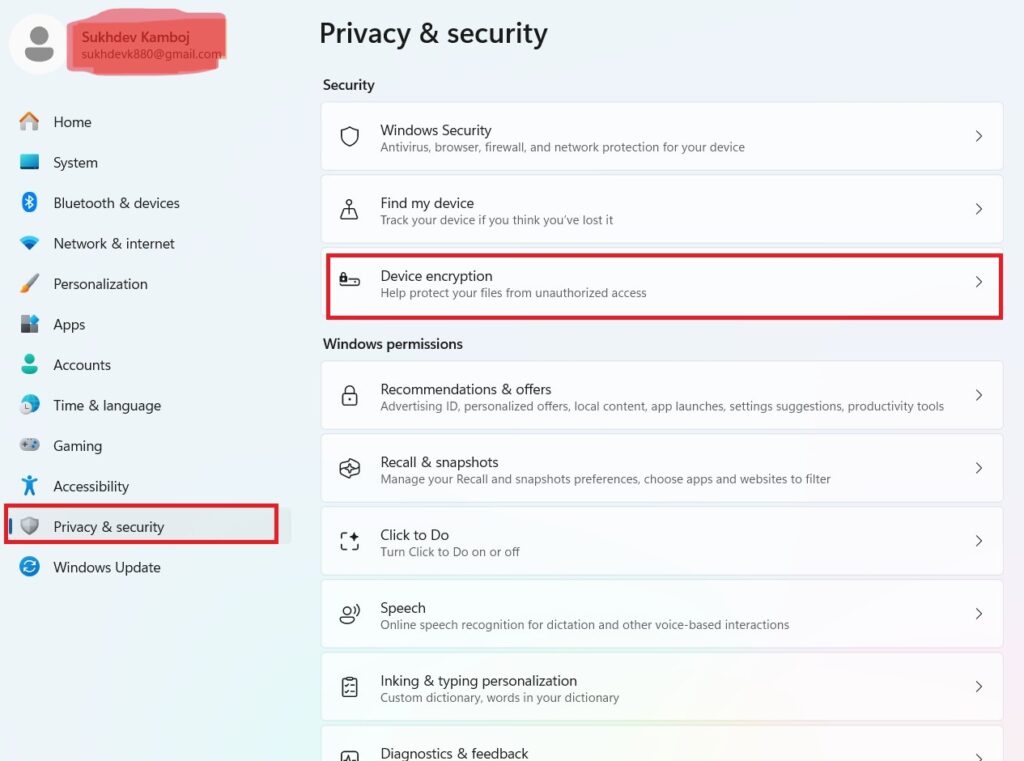
Click on Device encryption (on Home editions) or BitLocker drive encryption (on Pro and above).
You’ll see a list of drives on your system, each labeled with its current encryption status.
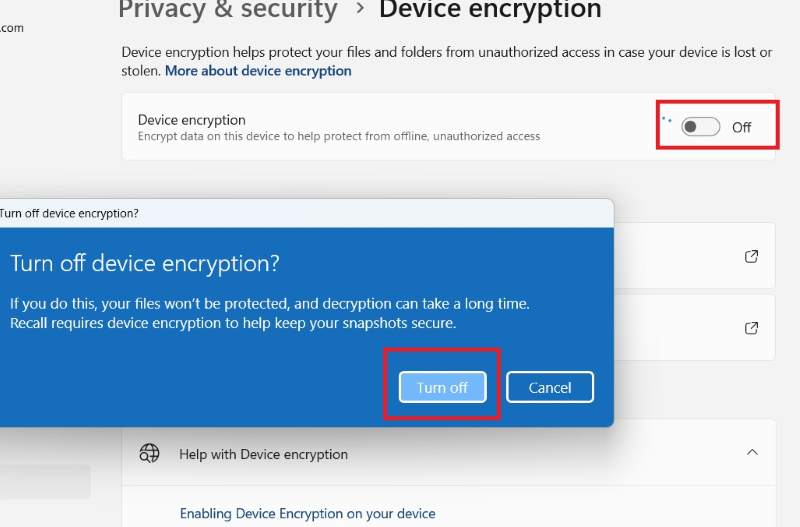
Find the drive you want to decrypt and click the Turn off button next to it.
Confirm the action when prompted. Windows will begin the decryption process in the background, and you can continue using your PC as it works.
You can monitor progress by returning to this same settings page, where a progress indicator will show how much of the drive has been decrypted.
Method 2: Disabling BitLocker via Control Panel
If you’re on Windows 11 Pro, Enterprise, or Education, the classic Control Panel interface gives you a bit more visibility into the process, including the ability to manage multiple drives at once.
- Open Control Panel. The quickest way is to search for “Control Panel” in the Start menu.
- Click System and Security.
- Select BitLocker Drive Encryption.
- You’ll see each of your drives listed, along with their current BitLocker status (on, off, or suspended).
- Click Turn off BitLocker next to the drive you want to decrypt.
- A confirmation dialog will appear, warning you that the drive will no longer be protected. Confirm to proceed.
- Windows will start decrypting the drive. A progress bar will appear in the Control Panel window, and you’re free to close it and keep working — decryption continues in the background.
This method is particularly useful if you manage several drives (for example, an internal SSD and an external backup drive) and want a single dashboard to check on all of them.
Method 3: Disabling BitLocker via Command Prompt
For users who prefer working from the command line, or who need to script the process across multiple machines, Windows provides the manage-bde command-line utility. This approach is also handy if the graphical interface is unresponsive or unavailable for some reason.
- Search for Command Prompt in the Start menu, right-click it, and choose Run as administrator. You need elevated privileges for this to work.
- To turn off BitLocker on a specific drive, run:
manage-bde -off C:Replace C: with the letter of the drive you want to decrypt. 3. Decryption will begin immediately in the background. To check how far along it is, run:
manage-bde -status C:This will display the current protection status, percentage encrypted, and other useful details. 4. You can continue using your computer normally while decryption completes. There’s no need to keep the Command Prompt window open.
This method is especially useful for IT administrators managing many machines through scripts, since manage-bde commands can be incorporated into batch files or deployment tools like PowerShell scripts or Group Policy startup scripts.
Method 4: Disabling BitLocker via PowerShell
PowerShell offers a more modern scripting alternative to manage-bde, with cmdlets that integrate more cleanly into automation workflows.
- Open PowerShell as Administrator by searching for it in the Start menu and selecting “Run as administrator.”
- Run the following cmdlet to disable BitLocker on a specific drive:
powershell
Disable-BitLocker -MountPoint "C:"- To check the status of decryption, use:
powershell
Get-BitLockerVolume -MountPoint "C:"This returns detailed information, including the VolumeStatus and EncryptionPercentage fields, so you can track progress precisely.
PowerShell’s BitLocker cmdlets are particularly useful if you’re already managing your system through scripts, since they return structured objects rather than plain text, making it easier to check status programmatically.
What Happens After You Disable BitLocker
Once decryption finishes, your drive will show a status of “unencrypted” or “off” in whichever interface you used. From this point forward, Windows will boot normally without prompting for a BitLocker PIN or password, and there’s no more recovery key to worry about for that drive. Performance may see a very slight improvement, since the CPU no longer needs to encrypt and decrypt data on the fly, though on modern hardware with AES acceleration, this difference is usually negligible.
If you later change your mind, re-enabling BitLocker is just as easy as disabling it — head back to the same Settings, Control Panel, or command-line tool and turn it back on. Windows will generate a new recovery key, which you should save somewhere secure (a Microsoft account, a printed copy, or a USB drive) before you need it.
Conclusion
Disabling BitLocker in Windows 11 is a quick, low-friction process no matter which method you choose — Settings, Control Panel, Command Prompt, or PowerShell all get you to the same result. The main thing to keep in mind is that decryption takes time and shouldn’t be interrupted, and that once it’s complete, your drive loses the protection BitLocker provides against unauthorized physical access. If your reason for disabling it is temporary, like a hardware change, consider whether suspending BitLocker might serve you better than a full decryption. But if you’ve decided encryption isn’t necessary for your situation, the steps above will have you back to an unencrypted drive in no time — and you can always turn protection back on later if your needs change.
Frequently Asked Questions
1. Will I lose my data if I disable BitLocker?
No. Disabling BitLocker decrypts your drive but does not delete or modify your files. The process simply removes the encryption layer, leaving your data intact and accessible. That said, you should avoid interrupting the decryption process — don’t shut down abruptly, unplug your laptop, or let the battery die while it’s running, as this could cause file corruption in rare cases.
2. How long does it take to turn off BitLocker?
The time required depends on the size of your drive and how much data it contains. A small SSD with modest data usage might decrypt in just a few minutes, while a large hard drive packed with files could take several hours. Windows lets you keep using your computer throughout, so you don’t need to sit and wait — just let it run in the background.
3. Do I need my recovery key to disable BitLocker?
In most cases, no. If you’re already logged into an unlocked, functioning Windows session, you can disable BitLocker directly through Settings, Control Panel, or command-line tools without entering a recovery key. You’d only need the recovery key if your drive is currently locked (for example, after a failed boot or hardware change) and you need to unlock it first before you can turn off protection.
4. Can I turn BitLocker back on later?
Yes, absolutely. Re-enabling BitLocker is just as simple as disabling it. Return to the same Settings menu, Control Panel page, or use manage-bde -on C: (or Enable-BitLocker in PowerShell) to start encrypting the drive again. Windows will generate a fresh recovery key during this process, which you should save in a secure location right away, since you’ll need it if you ever get locked out.
5. Does disabling BitLocker affect my computer’s performance?
You might notice a very slight performance improvement after disabling BitLocker, since the CPU no longer has to encrypt and decrypt data continuously. However, on most modern PCs — especially those with hardware-accelerated AES encryption built into the processor — this difference is minimal and often not noticeable in everyday use. The bigger practical change is the loss of the security protection BitLocker was providing.