








Windows 11 introduced stricter security policies, a new driver model, and hardware requirements that sometimes clash with legacy applications built for Windows XP, Vista, 7, or 8.1. If you’ve ever tried to run an old accounting program, a discontinued game, or a niche utility only to be met with an error message or a silent crash, you’re not alone. The good news is that Windows 11 still includes powerful built-in compatibility tools, and there are several proven workarounds for the stubborn cases that refuse to cooperate.
This guide walks you through every practical method to install and run older software on Windows 11 — from simple built-in compatibility settings to virtual machines and sandboxing tools — along with step-by-step tutorials, troubleshooting tips, and answers to the most common questions.
Why Older Software Fails on Windows 11
Before jumping into fixes, it helps to understand why legacy programs break in the first place. Common causes include:
- Missing dependencies — old apps may rely on outdated versions of .NET Framework, Visual C++ Redistributables, or DirectX components that aren’t installed by default.
- Driver-level restrictions — Windows 11 enforces signed drivers and blocks certain low-level hardware access that older software assumed was available.
- User Account Control (UAC) and permissions — legacy installers sometimes try to write directly to protected system folders or registry keys, which modern Windows blocks by default.
- 32-bit vs. 64-bit conflicts — very old software built for 16-bit or early 32-bit architectures can be incompatible with the way Windows 11 handles processes.
- Deprecated APIs — some Windows components used by old programs (like certain COM objects or legacy codecs) have been removed entirely in newer builds.
Once you know the likely cause, you can pick the right fix rather than guessing.
Before You Start: Safety and Preparation Tips
Running unsupported, older software always carries some risk — mainly around security vulnerabilities and system stability. Keep these precautions in mind:
- Create a restore point. Before installing anything old, use System Restore so you can roll back changes if something goes wrong.
- Download installers from trusted sources only. Old software is a common vector for malware because official download pages often disappear, leaving only third-party mirrors. Verify checksums where possible.
- Back up important files. If the software interacts with documents, databases, or system files, back them up first.
- Consider isolation. For anything you don’t fully trust, a virtual machine or sandbox (covered in Method 4) is much safer than installing directly on your main system.
With that groundwork covered, let’s go through each method.
Method 1: Use Windows 11’s Built-In Compatibility Mode
Compatibility Mode is the first thing to try for most legacy applications. It tells Windows to emulate the behavior of an older operating system version so the software “thinks” it’s running on the environment it was designed for.
Step-by-Step Tutorial
Locate the installer (.exe) or the shortcut of the already-installed program.
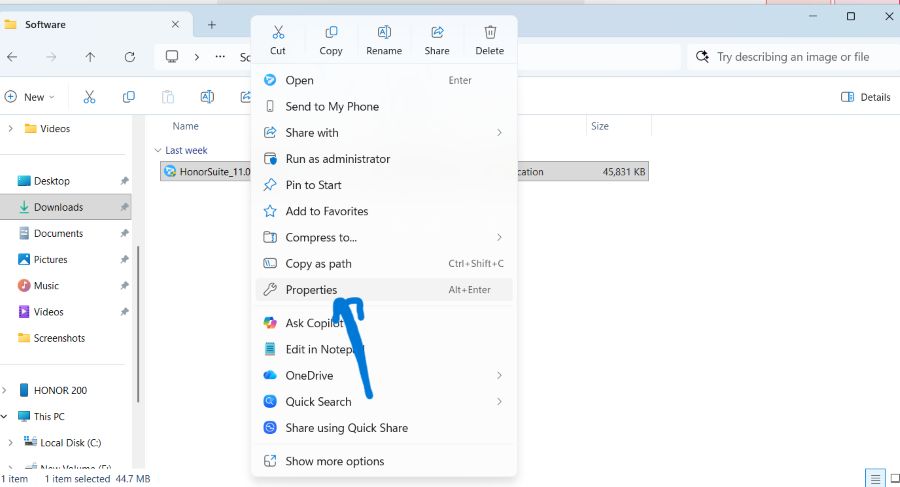
Right-click the file and select Properties.
Click the Compatibility tab.
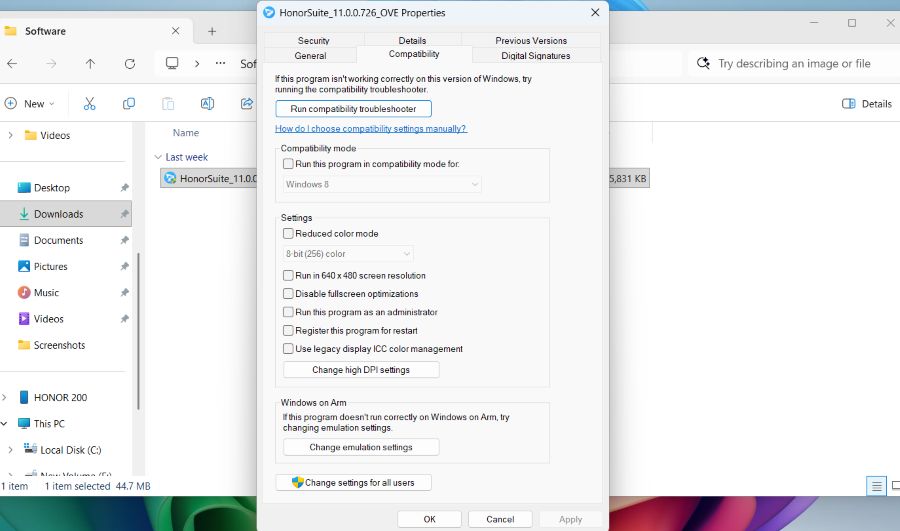
Check the box Run this program in compatibility mode for.
Choose the closest matching Windows version from the dropdown (e.g., Windows 7, Windows XP Service Pack 3, Windows Vista).
Optionally, check additional boxes under Settings:
- Reduced color mode — for old games with graphical glitches.
- Run in 640×480 screen resolution — for programs designed for very old monitors.
- Disable fullscreen optimizations — helps many older games run smoother.
- Run this program as an administrator — fixes many permission-related install failures.
Click Apply, then OK.
Run the installer or program again to see if the issue is resolved.
Using the Program Compatibility Troubleshooter
Windows 11 also includes an automated troubleshooter that tests different compatibility settings for you:
- Right-click the problematic .exe file.
- Select Troubleshoot compatibility.
- Choose Try recommended settings or Troubleshoot program to manually answer questions about the issue you’re experiencing (e.g., “The program worked in earlier versions of Windows but won’t install or run now”).
- Windows will test the settings and let you save them if the program runs correctly.
This method works well for software with minor compatibility issues, such as installers that check the OS version before proceeding or apps with display rendering problems.
Method 2: Install Missing Legacy Dependencies
Many “old software won’t install” errors aren’t actually about Windows 11 itself — they’re about missing runtime components the installer expects to find.
Step-by-Step Tutorial
- Identify the error message. Note any mention of missing DLL files, .NET errors, or “MSVCR” / “MSVCP” file errors — these point to missing Visual C++ Redistributables.
- Install legacy .NET Framework versions. Windows 11 doesn’t include older .NET Framework versions (like 3.5) by default.
- Open Settings > Apps > Optional Features.
- Click More Windows features (or search “Turn Windows features on or off”).
- Check .NET Framework 3.5 (includes .NET 2.0 and 3.0).
- Click OK and let Windows download and install it.
- Install multiple Visual C++ Redistributable versions. Old programs are often compiled against specific versions (2005, 2008, 2010, 2012, 2013, 2015-2022). Download the official redistributable packages directly from Microsoft’s website and install the ones matching your software’s requirements.
- Install legacy DirectX components. Some old games need DirectX 9.0c even though Windows 11 ships with DirectX 12. Use the Microsoft DirectX End-User Runtime installer to add the missing legacy DLLs alongside the modern version — they can coexist safely.
- Re-run the installer after each dependency is added to check whether the issue is resolved.
Method 3: Run the Installer with Elevated Permissions and Legacy User Settings
Some older installers were written before UAC existed and expect full, unrestricted access to system folders. Even with compatibility mode enabled, they may still fail.
Step-by-Step Tutorial
- Right-click the installer and choose Run as administrator.
- If the installer still fails, temporarily adjust User Account Control settings:
- Search for “Change User Account Control settings” in the Start menu.
- Move the slider down one notch to reduce prompt frequency (avoid moving it all the way to “Never notify” unless necessary, and revert afterward).
- If the software tries to write to
C:\Program Filesand fails due to permissions, consider installing it to a non-protected directory such asC:\OldApps\instead of the default location. - For programs that store settings in the registry under old-style paths, you may need to manually create the registry keys they expect. Use regedit carefully, and only if you’re comfortable editing the registry — back up the registry first via File > Export.
- If the software checks the exact Windows version number via the registry and refuses to proceed, some users successfully use compatibility mode combined with administrator rights, which resolves the majority of these version-check failures.
Method 4: Use a Virtual Machine for Maximum Compatibility
When compatibility mode and dependency fixes aren’t enough — especially for 16-bit programs, software with kernel-level hooks, or copy-protected installers from the 1990s and early 2000s — a virtual machine (VM) is the most reliable solution. It runs a genuine older operating system in an isolated container, so the software behaves exactly as it did on original hardware.
Step-by-Step Tutorial (Using Windows 11’s Built-In Hyper-V)
- Confirm Hyper-V is supported: your Windows 11 edition must be Pro, Enterprise, or Education (Home edition doesn’t include Hyper-V, use VirtualBox instead — see below).
- Open Settings > Apps > Optional Features > More Windows features.
- Check Hyper-V and click OK, then restart when prompted.
- Open Hyper-V Manager from the Start menu.
- Click New > Virtual Machine and follow the wizard:
- Assign a name (e.g., “Windows XP Legacy”).
- Choose Generation 1 for older OS compatibility.
- Allocate RAM (512MB–2GB is usually enough for XP/7-era software).
- Create a virtual hard disk.
- Attach an ISO file of the older Windows version you legally own.
- Start the VM and install the older Windows OS following the standard on-screen setup.
- Once installed, install your legacy software inside the VM exactly as you would on a real PC from that era.
Alternative: VirtualBox (Free, Works on Windows 11 Home)
- Download and install Oracle VirtualBox (free) from the official website.
- Click New, name your VM, and select the matching OS type/version.
- Allocate memory and create a virtual disk (VDI format, dynamically allocated is fine).
- Mount your old Windows ISO under Settings > Storage.
- Start the VM and complete the OS installation.
- Install VirtualBox Guest Additions for better performance and screen resolution support.
- Install your legacy application inside the VM.
Virtual machines are the gold standard for compatibility because the old software never has to deal with any Windows 11 restrictions at all — it’s running on what is, functionally, its native environment.
Method 5: Use Windows Sandbox for Safe, Temporary Testing
If you just want to test whether an old program works — or run it once without permanently installing anything — Windows Sandbox is a lightweight, disposable alternative to a full VM.
Step-by-Step Tutorial
- Ensure you have Windows 11 Pro, Enterprise, or Education (Sandbox isn’t available on Home).
- Open Settings > Apps > Optional Features > More Windows features.
- Check Windows Sandbox and restart your PC.
- Search for Windows Sandbox in the Start menu and launch it.
- Drag and drop the old installer file into the Sandbox window, or copy-paste it in.
- Run and test the software inside this isolated environment.
- Close the Sandbox when finished — everything inside is wiped automatically, leaving your main system untouched.
This method is ideal for testing suspicious or unverified old software before deciding whether it’s safe enough to install on your main OS or in a permanent VM.
Method 6: Try Compatibility-Focused Third-Party Tools
For particularly stubborn legacy applications, community-built compatibility layers can help:
- Compatibility Fix Databases (Shims): Advanced users can use the Microsoft Application Compatibility Toolkit-style “shims” to patch how an application detects the OS version, though this is now largely superseded by the built-in Compatibility tab settings.
- Wine-based emulation layers on Windows (rare, mostly for cross-platform edge cases).
- Dedicated retro-gaming compatibility layers for old DOS or Windows 9x-era games, which often work better than compatibility mode alone.
These tools are more niche and typically only necessary after Methods 1–5 have been exhausted.
Troubleshooting Checklist
If your old software still won’t run after trying the methods above, work through this checklist:
- ✅ Confirm you’re using the 64-bit vs. 32-bit correct installer version, if both exist.
- ✅ Temporarily disable antivirus/Windows Defender real-time protection during installation only (old installers are sometimes falsely flagged).
- ✅ Check whether the software requires a specific screen DPI setting — right-click the exe, go to Properties > Compatibility > Change high DPI settings, and try overriding scaling behavior.
- ✅ Search for a compatibility patch or unofficial updated installer created by the software’s community or fan base.
- ✅ As a last resort, consider whether a modern alternative with similar functionality might save time versus continued troubleshooting.
Frequently Asked Questions
1. Can I install 16-bit software on Windows 11?
No. Windows 11, like Windows 10, 8, and 7 (64-bit versions), does not support 16-bit applications natively because 64-bit Windows removed the NTVDM (NT Virtual DOS Machine) subsystem. The only reliable way to run genuine 16-bit or DOS-era software is through a virtual machine running an older 32-bit OS, or a dedicated DOS emulator such as DOSBox.
2. Is it safe to run very old, unsupported software on Windows 11?
It can be, as long as you take precautions. Download installers only from trusted or official sources, scan files with an updated antivirus before running them, and consider isolating anything uncertain inside Windows Sandbox or a virtual machine rather than installing it directly on your main system.
3. Why does compatibility mode not always fix installation errors?
Compatibility mode changes how Windows reports its version and certain behaviors to the application, but it doesn’t fix everything. If the software is missing actual system components (like an old .NET Framework version or a specific DirectX runtime) or relies on removed 16-bit subsystems, compatibility mode alone won’t resolve the problem — you’ll need to combine it with Method 2 (installing dependencies) or Method 4 (a virtual machine).
4. Do I need Windows 11 Pro to run a virtual machine or sandbox?
Hyper-V and Windows Sandbox are built into Windows 11 Pro, Enterprise, and Education editions only. Windows 11 Home users can still achieve the same result using free third-party virtualization software such as VirtualBox or VMware Workstation Player.
Conclusion
Running older software on Windows 11 is almost always possible with the right approach. For most compatibility hiccups, the built-in Compatibility Mode and Program Compatibility Troubleshooter will solve the problem in minutes. When installers fail due to missing components, manually installing legacy .NET Framework versions, Visual C++ Redistributables, and DirectX runtimes usually clears the way. Permission-related failures are typically fixed by running as administrator or adjusting UAC settings, while the most stubborn legacy programs — especially 16-bit or DOS-era software — need a virtual machine or Windows Sandbox for a truly compatible environment.
Start with the simplest method first, work your way down the list, and always prioritize safety by isolating unfamiliar or unverified old software. With these tools, even software built decades before Windows 11 existed can usually find a new home on your modern PC.