








Leaving a Windows 11 PC running around the clock wastes electricity, shortens the lifespan of internal components, and can leave your machine needlessly exposed on a network overnight. Whether you’re trying to cut down on your power bill, enforce screen-time limits for a family computer, or simply make sure your desktop powers down after a long download or render job finishes, Windows 11 gives you several built-in ways to schedule an automatic shutdown without installing any third-party software.
This guide walks through the most reliable methods for creating automatic shutdown tasks in Windows 11: using Task Scheduler for recurring shutdowns, the shutdown command in Command Prompt or PowerShell for one-off timed shutdowns, and a simple desktop shortcut you can double-click whenever you want a delayed shutdown on demand. Each method suits a different use case, so you can pick the one that best matches how you actually use your PC. By the end, you’ll be able to set up a shutdown schedule that fits your routine, adjust or cancel it whenever needed, and troubleshoot the most common issues people run into.
Method 1: Using Task Scheduler for Recurring Shutdowns
Task Scheduler is the most powerful and flexible option because it lets you define exactly when a shutdown happens — daily, weekly, at a specific time, or triggered by an event like login — and it keeps running in the background without any manual intervention.
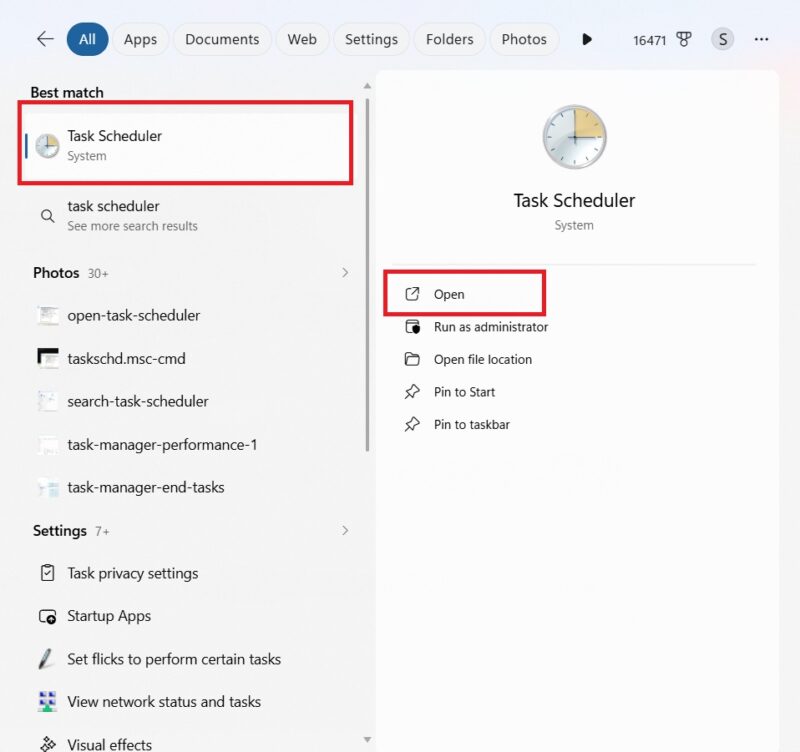
Step 1: Open Task Scheduler Press Win + S, type “Task Scheduler,” and open the app. Alternatively, press Win + R, type taskschd.msc, and press Enter.
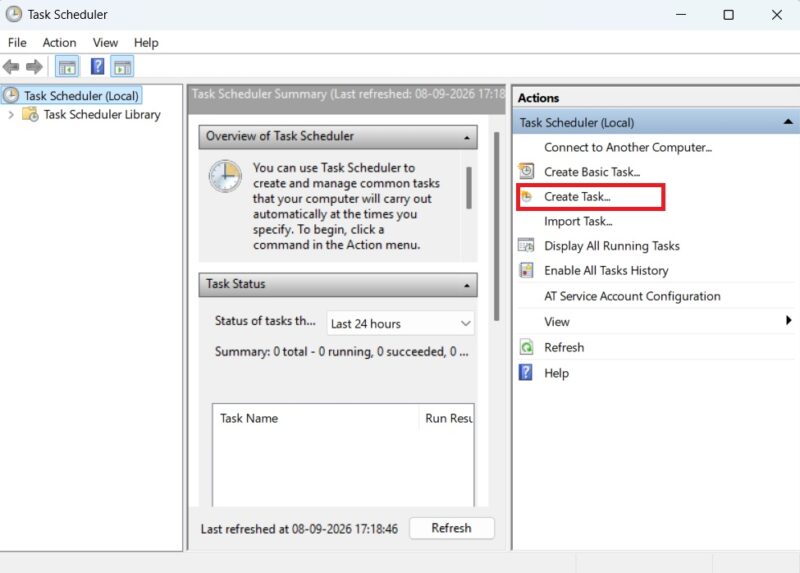
Step 2: Create a new task In the right-hand Actions pane, click “Create Task…” This gives you more control than the “Create Basic Task” wizard, though the basic wizard works fine if you only need a simple daily or weekly trigger. Name the task something recognizable, like “Auto Shutdown 11PM.”
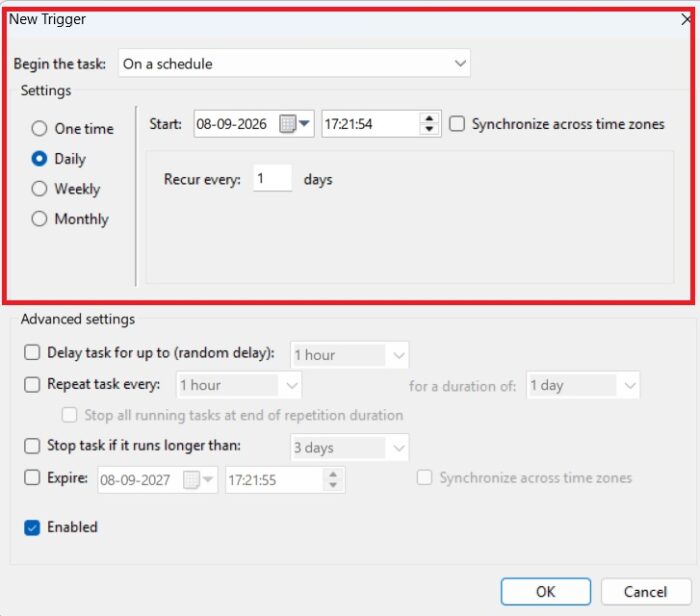
Step 3: Configure the trigger Switch to the Triggers tab and click “New.” Choose how often the task should run — daily, weekly, on a specific date, or at log on — and set the exact time. If you want the shutdown to happen every night, select “Daily” and pick your preferred hour.
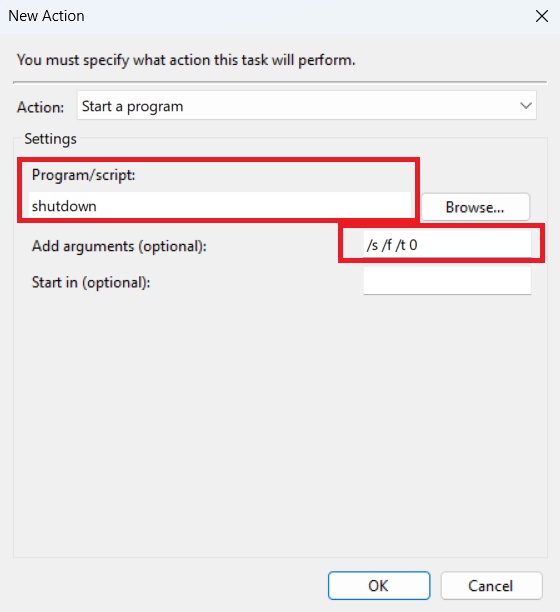
Step 4: Configure the action Move to the Actions tab and click “New.” Set the action to “Start a program.” In the Program/script field, type shutdown. In the “Add arguments” field, type /s /f /t 0. Here, /s tells Windows to shut down, /f forces any open applications to close without waiting for confirmation, and /t 0 sets the delay to zero seconds so the shutdown happens immediately once triggered.
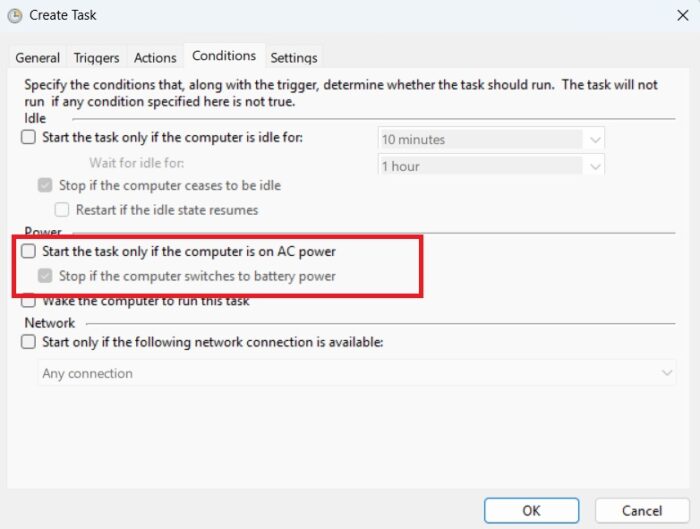
Step 5: Adjust conditions and settings On the Conditions tab, uncheck “Start the task only if the computer is on AC power” if you’re setting this up on a laptop that might be running on battery. On the Settings tab, you can enable “Run task as soon as possible after a scheduled start is missed,” which is useful if your PC happens to be asleep at the scheduled time.
Step 6: Save and test Click OK to save the task; you may be prompted for your administrator password. Find the task in the Task Scheduler Library, right-click it, and select “Run” to confirm it actually triggers a shutdown as expected.
Step 7: Modify or cancel later To pause the schedule without deleting it, right-click the task and choose “Disable.” To remove it entirely, right-click and select “Delete.” You can change the trigger time at any point by double-clicking the task and returning to the Triggers tab.
Method 2: Using the Shutdown Command in Command Prompt or PowerShell
If you don’t need a recurring schedule and just want your PC to shut down after a set number of minutes — for example, after a large file transfer finishes — the built-in shutdown command is faster to set up than Task Scheduler.
Step 1: Open Command Prompt or PowerShell Press Win + X and select “Terminal,” “Command Prompt,” or “PowerShell,” whichever you prefer. Administrator rights aren’t required for a local shutdown command.
Step 2: Run a timed shutdown Type shutdown /s /t 3600 and press Enter. This schedules a shutdown in 3,600 seconds (one hour). Adjust the number after /t to whatever delay you need, in seconds — for example, /t 1800 for 30 minutes.
Step 3: Cancel a scheduled shutdown If you change your mind, type shutdown /a and press Enter before the timer runs out. This aborts the pending shutdown.
Step 4: Add a warning message (optional) You can display a custom message to anyone using the PC before it shuts down by adding the /c flag, like this: shutdown /s /t 600 /c "PC will shut down in 10 minutes to save power."
This method is ideal for one-time use, but it doesn’t persist across reboots or repeat automatically, so it’s not a substitute for Task Scheduler if you want a nightly routine.
Method 3: Creating a Desktop Shortcut for On-Demand Shutdown
For a shutdown timer you can trigger with a single double-click — without opening a terminal window every time — a desktop shortcut is a convenient middle ground between the full Task Scheduler setup and typing commands manually.
Step 1: Right-click on the desktop Choose “New” > “Shortcut.”
Step 2: Enter the shutdown command In the location field, type shutdown /s /t 1800 (this example sets a 30-minute delay). Adjust the number of seconds to match whatever delay works best for you, then click “Next.”
Step 3: Name the shortcut Give it a clear name like “Shutdown in 30 Minutes,” then click “Finish.”
Step 4: Customize the icon (optional) Right-click the new shortcut, select “Properties,” click “Change Icon,” and pick an icon that makes it easy to spot, such as a power symbol.
Step 5: Create a cancel shortcut Repeat the process but use shutdown /a as the location, and name it something like “Cancel Shutdown.” Keep both shortcuts side by side so you can start or stop the timer instantly.
This method works well for shared or family computers, since anyone can trigger a delayed shutdown without needing to know command-line syntax or having admin access to Task Scheduler.
Method 4: Using Windows Settings for Sleep and Screen Timers (A Related Alternative)
While Windows 11 doesn’t have a dedicated “automatic shutdown” toggle in Settings the way it does for sleep, it’s worth knowing this option exists as a lighter-weight alternative, especially if your goal is power saving rather than a hard shutdown.
Step 1: Open Settings Press Win + I, then go to System > Power & Battery.
Step 2: Configure Screen and Sleep timers Under “Screen and sleep,” set how long the display stays on and when the PC goes to sleep on battery and when plugged in.
Step 3: Understand the difference from shutdown Sleep mode preserves your open applications and session in memory (or on disk, with hibernation) so you can resume instantly, while a full shutdown closes everything and powers off completely. If your priority is saving energy without losing your work session, sleep or hibernation may suit you better than a scheduled shutdown. If you specifically need the machine fully off — for security, noise, or heat reasons — stick with Methods 1 through 3.
Conclusion
Windows 11 gives you multiple built-in paths to automate shutdowns, and the right one depends on how predictable your routine is. Task Scheduler is the best choice for a recurring, hands-off schedule you can set once and forget. The shutdown command in Command Prompt or PowerShell is faster for a one-off timed shutdown tied to a specific task, like finishing a download. A desktop shortcut offers a friendly, no-typing-required option for shared computers. And if your real goal is power savings rather than a full shutdown, the Sleep and Screen timers in Settings might be all you need. None of these methods require third-party software, so you can experiment with more than one and settle on whichever fits your habits best.
Frequently Asked Questions
1. Will an automatic shutdown close my unsaved work? Yes, if you use the /f flag, open applications are force-closed, which can mean losing unsaved changes. To avoid this, remove /f from the command so Windows waits for programs to close gracefully and prompts you to save if needed. Keep in mind that without /f, a stubborn application can sometimes block the shutdown entirely.
2. Can I schedule a shutdown that only happens on weekdays? Yes. In Task Scheduler, when creating your trigger, select “Weekly” instead of “Daily,” and then check only the days you want, such as Monday through Friday. This is useful for work computers you want powered down every night but left alone on weekends.
3. Why didn’t my scheduled shutdown task run? The most common causes are the PC being asleep, off, or disconnected from power at the scheduled time, or the task’s conditions being too restrictive. Check the Conditions tab in Task Scheduler and make sure “Start the task only if the computer is on AC power” isn’t blocking it on a laptop running on battery, and confirm the “Wake the computer to run this task” option is enabled if the PC might be asleep.
4. How do I stop or delete an automatic shutdown task once it’s set up? For a Task Scheduler task, open Task Scheduler, find the task in the library, right-click it, and choose “Disable” to pause it or “Delete” to remove it permanently. For a shutdown triggered by the command line or a desktop shortcut, run shutdown /a before the countdown finishes to cancel the pending shutdown.