








Data security has never been more important than it is today. Whether you’re a home user storing personal photos and financial documents, or a business professional handling sensitive client information, protecting your data from unauthorized access is essential. One of the most effective ways to safeguard the information on your Windows 11 PC is by using BitLocker Drive Encryption, a built-in security feature developed by Microsoft.
BitLocker works by encrypting the entire contents of a drive, making the data unreadable to anyone who doesn’t have the correct decryption key or password. This means that even if your laptop is lost, stolen, or accessed by someone without authorization, they won’t be able to read your files without proper credentials. Unlike third-party encryption tools that may require additional purchases or complicated setup processes, BitLocker is integrated directly into Windows 11, making it a convenient and reliable option for many users.
BitLocker is particularly valuable for people who travel frequently with laptops, store confidential business data, or simply want an extra layer of protection for their personal files. It works seamlessly in the background once configured, requiring no ongoing maintenance from the user. The feature is especially useful for organizations that need to comply with data protection regulations, as it provides a straightforward way to demonstrate that sensitive data is encrypted at rest.
It’s worth noting that BitLocker isn’t available on every edition of Windows 11. It comes standard with Windows 11 Pro, Enterprise, and Education editions. If you’re running Windows 11 Home, you’ll have access to a scaled-down version called “Device Encryption,” which offers similar protection but with fewer configuration options. This guide will walk you through the process of enabling BitLocker on a Windows 11 Pro (or higher) machine, covering everything from checking system requirements to backing up your recovery key.
By the end of this article, you’ll have a clear understanding of how BitLocker works, how to enable it step by step, and how to manage it going forward. We’ll also address some frequently asked questions to clear up common points of confusion. Let’s get started.
Understanding BitLocker: A Quick Overview
Before diving into the setup process, it helps to understand what BitLocker actually does and how it fits into your overall security strategy. BitLocker uses a method called full-disk encryption, which means it doesn’t just protect specific files or folders — it encrypts the entire drive, including the operating system, installed programs, and all your personal data.
For BitLocker to work most effectively, your computer should ideally have a Trusted Platform Module (TPM) chip, specifically TPM 2.0, which is also a baseline hardware requirement for Windows 11 itself. The TPM is a small chip on your motherboard that securely stores encryption keys and helps verify the integrity of your system during startup. If the TPM detects any unauthorized changes to your system (such as tampering with the boot process), it can prevent your computer from starting normally, protecting your encrypted data from certain types of attacks.
If your device doesn’t have a TPM chip, you can still use BitLocker in some cases through Group Policy adjustments, though this is less secure and generally not recommended for typical users. Most modern PCs sold in the last several years come with TPM 2.0 built in, so this usually isn’t a concern.
Method: How to Enable BitLocker in Windows 11
Follow these steps carefully to enable BitLocker on your Windows 11 device.
Step 1: Check System Requirements
Before enabling BitLocker, confirm that your device meets the necessary requirements:
- Windows 11 Pro, Enterprise, or Education edition
- A TPM 2.0 chip (recommended, though not always mandatory)
- A minimum of two partitions on your hard drive (Windows usually creates these automatically during installation)
- Administrator access to the PC
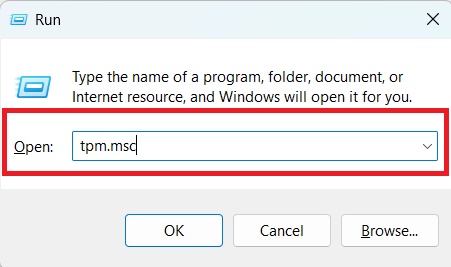
To check whether your device has a TPM chip, press Windows key + R, type tpm.msc, and press Enter. This opens the TPM Management console, where you can verify that TPM is present and enabled. If it says “Compatible TPM cannot be found,” you may need to enable it in your BIOS/UEFI settings, or your device may not support it.
Step 2: Sign In as an Administrator
BitLocker configuration requires administrator privileges. Make sure you’re signed in to an account with administrator rights before proceeding. If you’re using a standard user account, you’ll either need to switch to an administrator account or have someone with those credentials assist you.
Step 3: Open the BitLocker Settings
There are a couple of ways to access BitLocker settings:
Option A: Through Control Panel
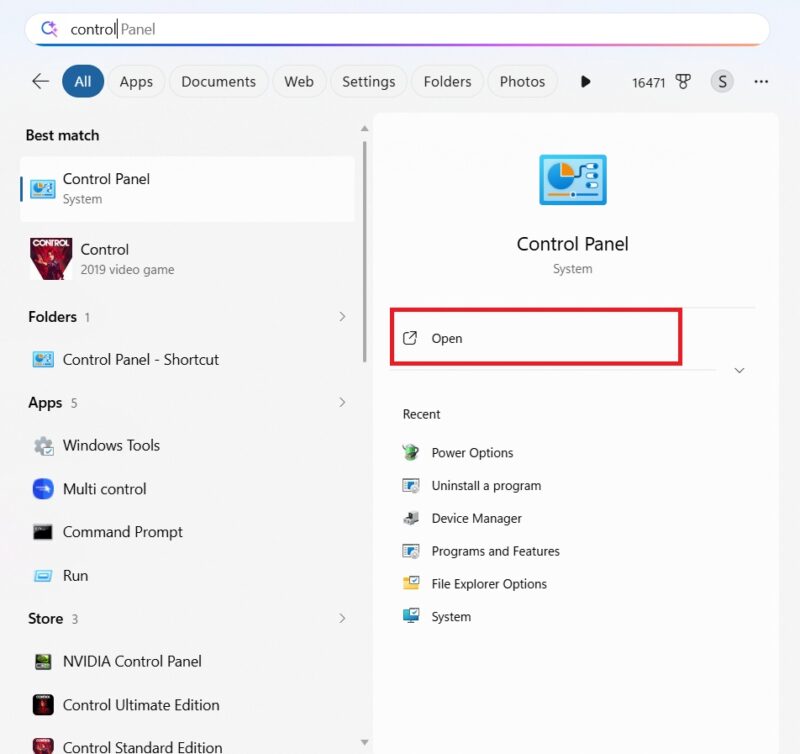
Click the Start button and type Control Panel, then open it.
Set “View by” to Category.
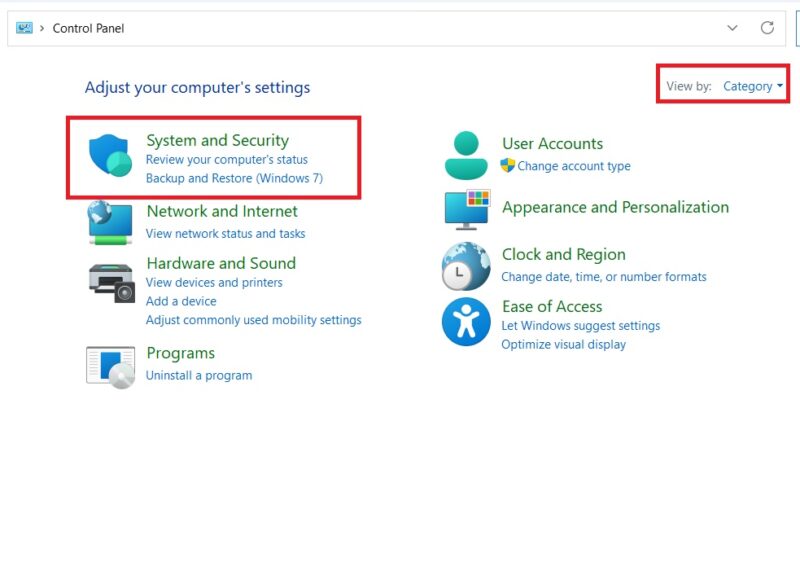
Click on System and Security.
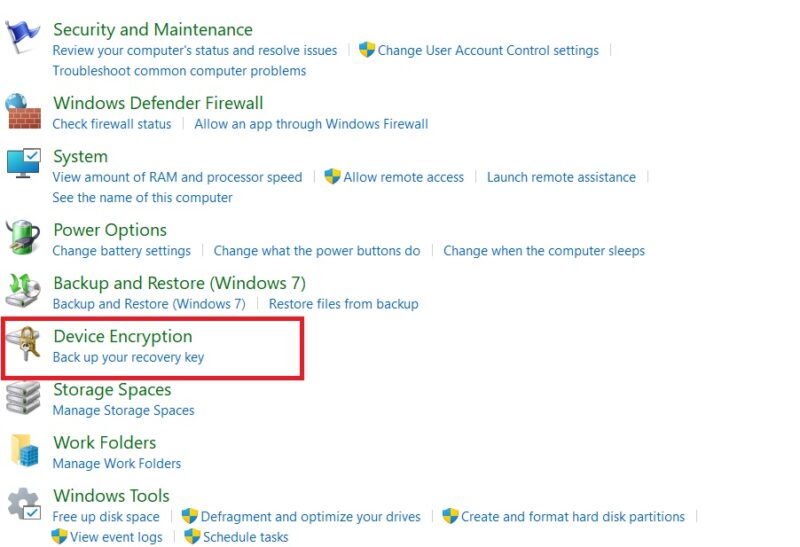
Select BitLocker Drive Encryption.
Option B: Through Settings App
- Open the Settings app (Windows key + I).
- Go to Privacy & Security.
- Click on Device Encryption or search for “BitLocker” in the search bar and select Manage BitLocker.
Either method will take you to the main BitLocker management screen, where you’ll see a list of all the drives on your system, including your primary system drive (usually C:) and any additional internal or external drives.
Step 4: Turn On BitLocker
- On the BitLocker management screen, locate the drive you want to encrypt — typically your system drive (C:).
- Click Turn on BitLocker next to that drive.
- Windows will perform a quick check to ensure your system meets the requirements. This may take a few moments.
Step 5: Choose How to Unlock Your Drive at Startup
If your device has TPM, Windows may automatically use it to unlock the drive during startup without requiring additional input from you. However, you can also add extra layers of security:
- Enter a password: Requires a password each time you start your PC.
- Insert a USB flash drive: Requires a USB key to be plugged in during startup.
Choose the option that best fits your security needs and follow the on-screen prompts to set it up.
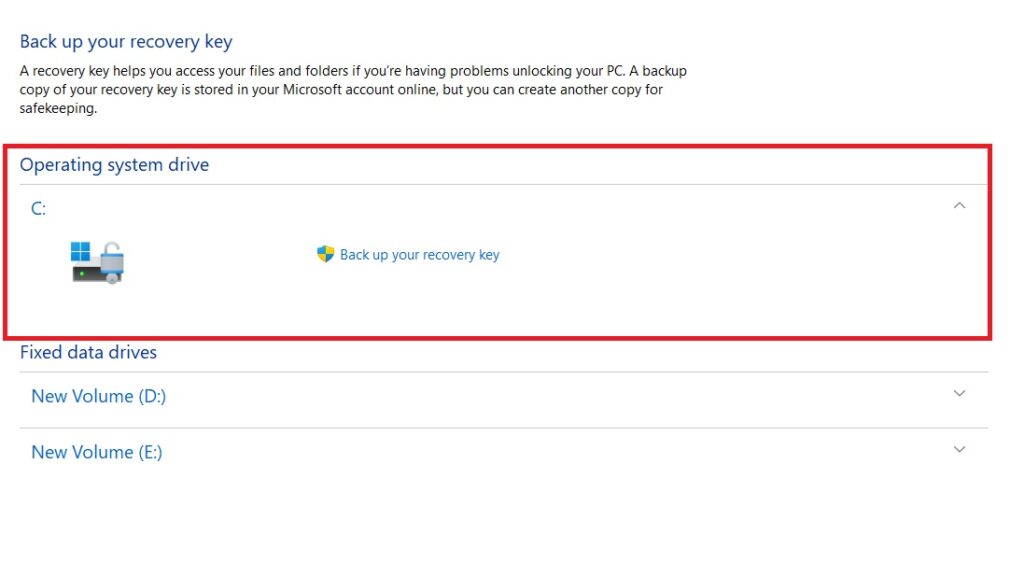
Step 6: Back Up Your Recovery Key
This is one of the most critical steps in the entire process. Your recovery key is a 48-digit numerical password that allows you to unlock your drive if you forget your password, lose your USB key, or if BitLocker detects a potential security issue during startup. Without this key, you could permanently lose access to your data.
Windows will present you with several options for saving your recovery key:
- Save to your Microsoft account: This uploads the key securely to your Microsoft account, where you can retrieve it later from any device.
- Save to a USB flash drive: Stores the key as a file on a removable drive.
- Save to a file: Saves the recovery key as a text file on your computer (ideally not on the drive you’re encrypting).
- Print the recovery key: Creates a physical, printed copy you can store somewhere safe.
It’s a good idea to use more than one of these options for redundancy. For instance, saving it to your Microsoft account and also printing a physical copy provides backup in case one method becomes inaccessible.
Step 7: Choose the Encryption Scope
Next, you’ll be asked how much of your drive to encrypt:
- Encrypt used disk space only: Faster and recommended for new PCs or newly installed drives, as it only encrypts the space currently occupied by data.
- Encrypt entire drive: Slower but more thorough, recommended for PCs or drives that have been in use for a while, since it also encrypts space that may contain remnants of previously deleted files.
Step 8: Select the Encryption Mode
You’ll also be prompted to choose an encryption mode:
- New encryption mode: Best for fixed drives on Windows 11 devices, offering improved security.
- Compatible mode: Best for drives that might be moved to or read by older versions of Windows.
For most users encrypting an internal drive on a modern PC, the new encryption mode is the appropriate choice.
Step 9: Run the BitLocker System Check
Before starting encryption, Windows will typically ask if you want to run a BitLocker system check. It’s recommended to leave this option checked, as it ensures your PC can correctly read the recovery key before the actual encryption process begins.
Step 10: Start Encrypting
Click Continue, then Start Encrypting. Depending on the size of your drive and the amount of data stored, this process can take anywhere from a few minutes to several hours. You can continue using your computer during this time, though performance may be slightly reduced until encryption completes.
Once finished, you’ll see a confirmation that BitLocker is now on for that drive, and a small padlock icon will typically appear next to the drive letter in File Explorer, indicating it’s encrypted and unlocked.
Managing BitLocker After Setup
After enabling BitLocker, you can return to the BitLocker management screen at any time to check the encryption status, suspend protection temporarily (useful during certain system updates or hardware changes), change your unlock method, or turn off BitLocker entirely if needed. It’s a good habit to periodically verify that your recovery key backups are still accessible, especially if you switch Microsoft accounts or replace storage devices.
Conclusion
Enabling BitLocker on your Windows 11 device is one of the simplest yet most effective steps you can take to protect your data from unauthorized access. Whether you’re safeguarding sensitive work documents, personal financial records, or family photos, full-disk encryption ensures that your information remains secure even if your device falls into the wrong hands.
The process, while it involves several steps, is largely guided by Windows itself and doesn’t require advanced technical knowledge. The most important part of the entire process is safely storing your recovery key — losing it could mean losing access to your own data permanently, so take the time to back it up in multiple secure locations.
As cyber threats and physical device theft remain ongoing concerns, taking a few extra minutes to enable BitLocker is a small investment that can prevent significant headaches down the road. If your edition of Windows 11 doesn’t support full BitLocker, remember that Device Encryption offers similar baseline protection and is often enabled by default on compatible hardware.
Ultimately, encryption is just one part of a broader security strategy that should also include strong passwords, regular software updates, and cautious online behavior. But when it comes to protecting the physical data stored on your device, BitLocker remains one of the most trusted and accessible tools available to Windows users.
Frequently Asked Questions (FAQ)
1. Is BitLocker available on Windows 11 Home edition?
No, full BitLocker functionality is not available on Windows 11 Home. However, many devices running Windows 11 Home come with a similar feature called Device Encryption, which is automatically enabled on supported hardware, particularly devices that meet Microsoft’s modern standby and TPM requirements. Device Encryption offers less configuration flexibility than BitLocker but still provides solid protection for your data.
2. What happens if I lose my BitLocker recovery key?
If you lose your recovery key and are also unable to unlock your drive using your normal method (such as your TPM-based automatic unlock or password), you may permanently lose access to the data on that drive. This is why it’s crucial to back up your recovery key in multiple locations, such as your Microsoft account, a printed copy, and a separate USB drive, at the time you enable BitLocker.
3. Will BitLocker slow down my computer?
In most modern systems, the performance impact of BitLocker is minimal to negligible, especially on PCs with solid-state drives (SSDs) and dedicated encryption hardware support. You may notice a temporary slowdown while the initial encryption process is running, but day-to-day performance afterward is typically unaffected for most users.
4. Can I use BitLocker on external hard drives and USB flash drives?
Yes, BitLocker includes a feature called BitLocker To Go, specifically designed for encrypting removable storage devices like external hard drives and USB flash drives. You can access this by right-clicking the removable drive in File Explorer and selecting the BitLocker option, then following a similar setup process to what’s used for internal drives.