








Over time, every Windows 11 PC accumulates digital clutter — temporary files, cached data, old downloads, duplicate documents, and files sitting in the Recycle Bin. This buildup doesn’t just eat into your storage space; it can slow down your system, increase boot times, and make it harder to find the files that actually matter. The good news is that you don’t have to manually delete these files every week. Windows 11 comes with built-in tools, and you can combine them with PowerShell scripts and Task Scheduler to create a fully automated file cleanup system that runs quietly in the background.
In this guide, you’ll learn how to automate file cleanup in Windows 11 using native features like Storage Sense and Disk Cleanup, as well as more advanced methods involving PowerShell scripts, batch files, and third-party automation tools. Whether you’re a casual user who wants a tidier desktop or an IT professional managing multiple machines, this tutorial covers every method you need — with clear, actionable steps.
Why Automate File Cleanup in Windows 11?
Before diving into the “how,” it’s worth understanding the “why.” Manual cleanup is inconsistent — most people forget to do it until their storage is nearly full or their PC starts lagging. Automation solves this by:
- Saving time — no more manually hunting for temp files or emptying the Recycle Bin
- Freeing up disk space consistently, which is especially useful on SSDs with limited capacity
- Improving system performance by reducing clutter that can slow file indexing and search
- Reducing security risks from old cached files, browser data, and leftover installer files
- Maintaining consistency across multiple devices if you manage several PCs
Now let’s look at the key methods for setting this up.
Method 1: Automate Cleanup with Storage Sense
Storage Sense is Windows 11’s built-in automated cleanup tool. It’s the easiest way to get started because it requires no scripting knowledge at all.
What Storage Sense Does
Storage Sense automatically deletes temporary files, empties the Recycle Bin after a set number of days, and can even free up space by removing local copies of cloud-backed files (like OneDrive files) that haven’t been opened recently.
Step-by-Step: Setting Up Storage Sense
Open Settings by pressing Windows + I.
Navigate to System > Storage.
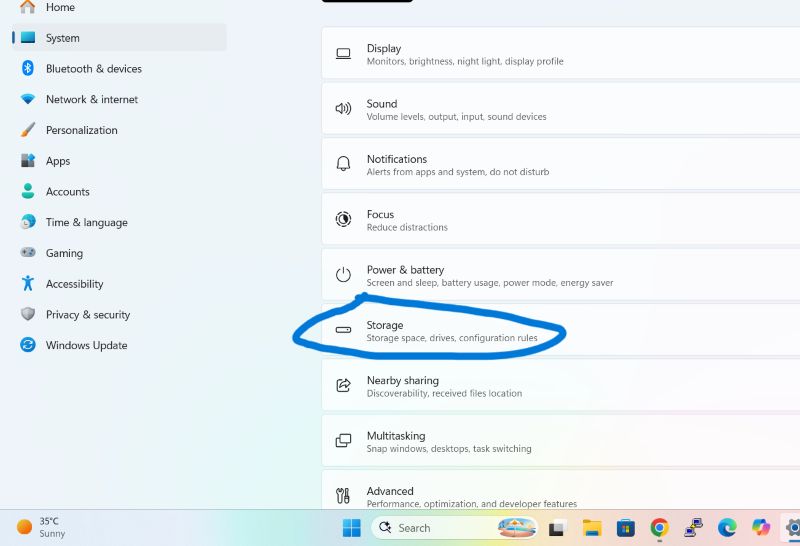
Toggle Storage Sense to On.
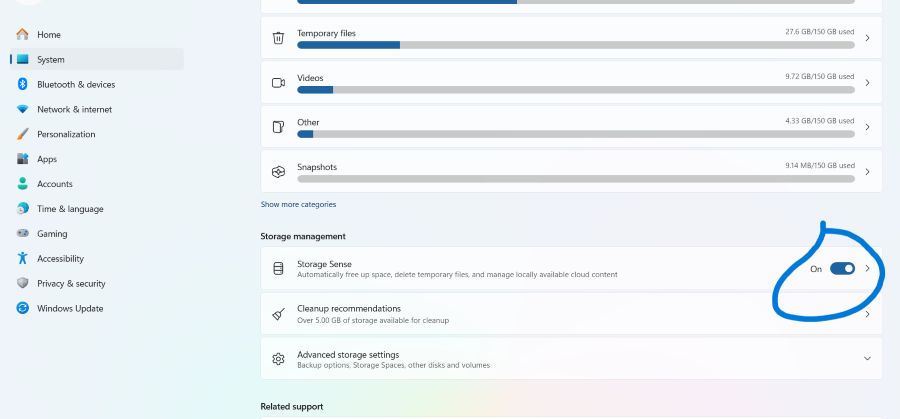
Click on Storage Sense to open advanced configuration.
Under “Configure cleanup schedules,” set how often Storage Sense should run: Every day, Every week, Every month, or During low free disk space (default).
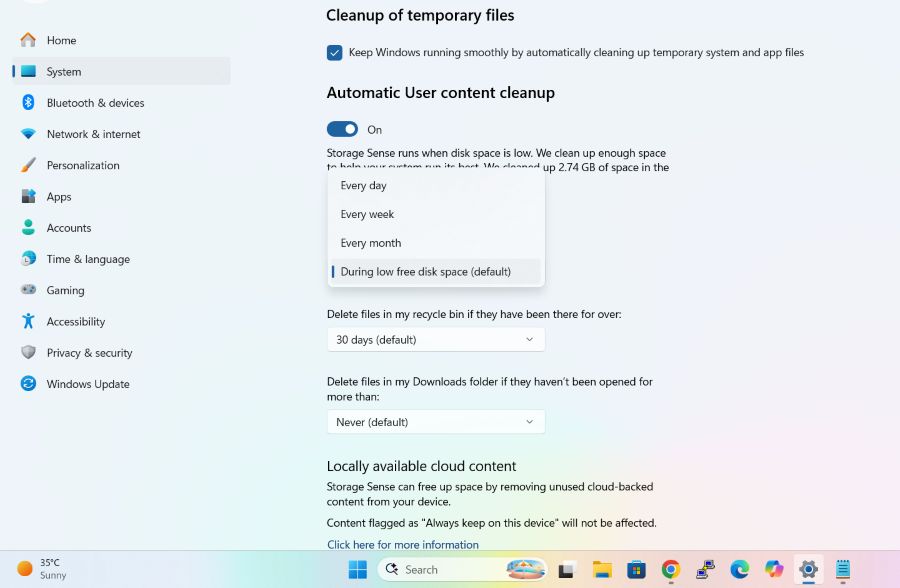
Configure the Recycle Bin settings — for example, delete files that have been in the Recycle Bin for more than 14 or 30 days.
Do the same for the “Downloads” folder if you want old downloads cleared automatically.
Under “Locally available cloud content,” choose when unused OneDrive files should be converted back to online-only versions to save local space.
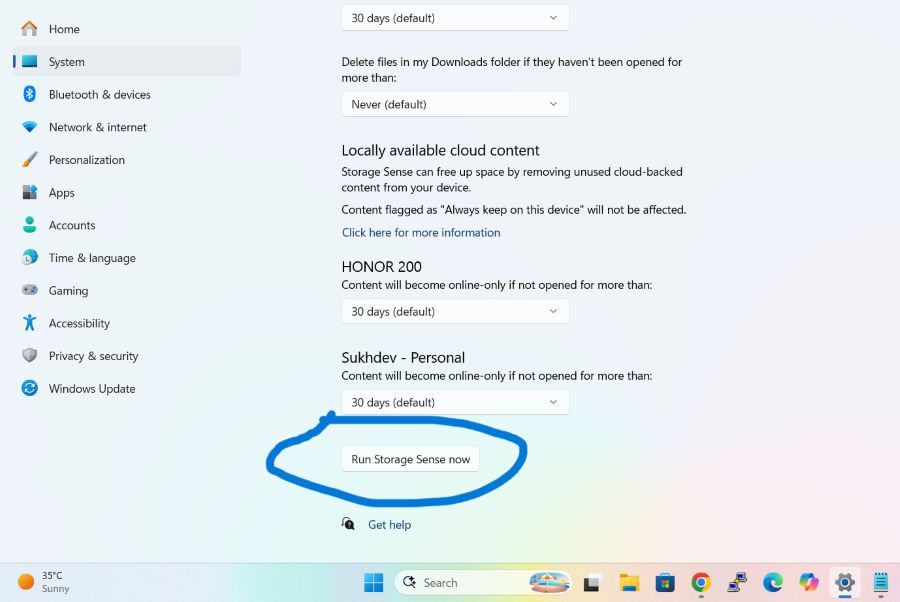
Click Run Storage Sense now to test it immediately.
This method is ideal for everyday users who want a “set it and forget it” solution without touching scripts or the command line.
Method 2: Automate Disk Cleanup with Task Scheduler
Disk Cleanup (cleanmgr.exe) is a classic Windows utility that can be automated to run on a schedule using Task Scheduler — giving you more control than Storage Sense alone.
Step-by-Step: Scheduling Disk Cleanup
- Press
Windows + R, typecleanmgr, and press Enter. - Select your system drive (usually
C:) and click OK. - Click Clean up system files for a deeper scan, including Windows Update leftovers.
- Select the file categories you want to remove (Temporary Files, Recycle Bin, Thumbnails, Delivery Optimization Files, etc.), then click OK and confirm.
- Once you’ve selected your preferences, open Task Scheduler by searching for it in the Start menu.
- Click Create Basic Task in the right-hand panel.
- Name the task (e.g., “Automated Disk Cleanup”) and click Next.
- Choose a trigger — Weekly or Monthly works well for most users — and set the time.
- Select Start a Program as the action.
- In the “Program/script” field, enter:
cleanmgr.exe- In “Add arguments,” enter:
/sagerun:1(This runs Disk Cleanup using the preset you configured in step 4, using the `/sageset:1` profile behind the scenes.)12. Click Finish to save the task.
Tip: To create the saved cleanup profile referenced above, first run cleanmgr /sageset:1 from the Run dialog, select your preferred file types, and save — this creates the profile that /sagerun:1 will use automatically.
Method 3: Automate Cleanup with PowerShell Scripts
For users who want granular control — such as deleting files older than a certain number of days from specific folders — PowerShell is the most powerful and flexible option.
Step-by-Step: Creating a PowerShell Cleanup Script
- Open Notepad or any text editor.
- Paste in a script like this, which deletes files older than 30 days from the Downloads and Temp folders:
powershell
# Define target folders and age threshold
$folders = @(
    "$env:USERPROFILE\Downloads",
    "$env:TEMP"
)
$daysOld = 30
$cutoffDate = (Get-Date).AddDays(-$daysOld)

foreach ($folder in $folders) {
    if (Test-Path $folder) {
        Get-ChildItem -Path $folder -Recurse -File -ErrorAction SilentlyContinue |
            Where-Object { $_.LastWriteTime -lt $cutoffDate } |
            Remove-Item -Force -ErrorAction SilentlyContinue
    }
}

# Empty the Recycle Bin
Clear-RecycleBin -Force -ErrorAction SilentlyContinue- Save the file as
CleanupScript.ps1(make sure “Save as type” is set to “All Files” so it doesn’t save as.txt). - Test the script by right-clicking it and selecting Run with PowerShell. If prompted about execution policy, you may need to run PowerShell as Administrator and execute:
Set-ExecutionPolicy RemoteSigned -Scope CurrentUser- Once confirmed working, open Task Scheduler and create a new task as described in Method 2.
- Under “Action,” select Start a Program, and set the program to:
powershell.exe- In “Add arguments,” enter:
-ExecutionPolicy Bypass -File "C:\Path\To\CleanupScript.ps1"- Set your desired trigger (daily, weekly, or at logon) and save the task.
This method lets you target specific file types, folders, and age thresholds — something Storage Sense and Disk Cleanup can’t do as precisely.
Method 4: Automate Cleanup with Batch Files
If PowerShell feels too advanced, a simple batch (.bat) file can achieve similar results using basic Command Prompt commands.
Step-by-Step: Creating a Batch File for Cleanup
- Open Notepad and paste the following:
batch
@echo off
echo Cleaning temporary files...
del /q /f /s %TEMP%\*.*
del /q /f /s C:\Windows\Temp\*.*
echo Emptying Recycle Bin...
PowerShell.exe -NoProfile -Command "Clear-RecycleBin -Force"
echo Cleanup complete.- Save the file as
cleanup.bat(again, choose “All Files” as the type). - Test it by double-clicking the file.
- Once confirmed, schedule it through Task Scheduler the same way as the PowerShell script, but set the program/script field to the path of your
.batfile directly — no additional arguments needed.
Batch files are simpler to write and read than PowerShell but offer less flexibility for advanced filtering (like file age).
Method 5: Use Third-Party Automation Tools
If you prefer a visual interface over scripting, several trusted third-party tools can automate cleanup with scheduling built in:
- CCleaner — offers scheduled cleaning, browser cache clearing, and registry cleanup, with a free and paid tier.
- BleachBit — an open-source alternative with granular control over what gets deleted.
- Wise Disk Cleaner — includes a built-in scheduler for automatic cleanup on a set frequency.
These tools typically have their own “Scheduled Cleaning” settings inside the app, so once installed, you simply configure the frequency and file types from within their interface rather than using Task Scheduler directly.
Combining Methods for a Complete Automated System
For the best results, many users combine multiple methods:
- Storage Sense for ongoing, low-effort background cleanup
- A scheduled PowerShell script for targeted cleanup of specific folders (like Downloads, Desktop, or project directories)
- Task Scheduler to run everything automatically without manual intervention
This layered approach ensures your system stays clean at both the OS level and the folder level, without requiring daily attention.
Best Practices for Safe Automated Cleanup
- Always test scripts manually first before scheduling them, to avoid accidentally deleting important files.
- Exclude critical folders (like active project directories) from any automation rules.
- Back up important files before setting up aggressive automated deletion, especially when targeting the Downloads folder.
- Review logs periodically if your script or tool supports logging, so you know what’s being deleted.
- Use file age thresholds (like 30+ days) rather than deleting everything, to avoid removing files you still need.
Frequently Asked Questions (FAQ)
1. Is it safe to automate file cleanup in Windows 11?
Yes, as long as you configure it carefully. Built-in tools like Storage Sense and Disk Cleanup are designed to only remove genuinely unnecessary files, such as temporary files, cache, and old Recycle Bin items. When using custom PowerShell or batch scripts, safety depends on how you configure the target folders and file age thresholds — always test scripts manually before scheduling them to avoid deleting important data.
2. Will automated cleanup delete my personal files like documents or photos?
Not if configured correctly. Storage Sense and Disk Cleanup only target temporary and cache files by default, not personal documents. If you’re using a custom script targeting folders like Downloads or Desktop, be specific about file age and location to avoid accidentally removing files you still need, and always exclude folders containing important personal data.
3. How often should I schedule automated cleanup?
For most users, a weekly schedule strikes a good balance between keeping the system clean and avoiding unnecessary disk activity. Users with heavier file usage (like developers or content creators generating lots of temp files) may benefit from daily cleanup, while lighter users can opt for a monthly schedule through Storage Sense or Task Scheduler.
4. Can I undo an automated cleanup if it deletes something important?
If the file was removed via the Recycle Bin, you can restore it as long as the Recycle Bin itself hasn’t been emptied. However, direct deletions from scripts (using commands like Remove-Item -Force or del /q) typically bypass the Recycle Bin and are much harder to recover — this is why testing scripts manually and using file-age filters before scheduling them is so important.
Conclusion
Automating file cleanup in Windows 11 is one of the simplest ways to keep your PC running smoothly without dedicating time to manual maintenance. Whether you rely on the built-in Storage Sense feature for effortless background cleanup, schedule Disk Cleanup through Task Scheduler, or build a custom PowerShell or batch script for precise control, Windows 11 gives you multiple paths to achieve a clutter-free system.
For most users, starting with Storage Sense is the easiest entry point, while more advanced users and IT professionals will benefit from combining it with scheduled scripts for targeted, granular cleanup. Whichever method you choose, the key is consistency — automation only pays off when it runs reliably in the background, freeing up your storage and keeping your system optimized without you having to lift a finger.